Monday, February 22, 2010

Enchilada Chicken Slow Cooker Recipe

This blog was inspired by www.moneysavingmom.com and www.smockityfrocks.com

This was one of my made up semi healthy meals that I used to eat almost every day... but it also makes a great filling for enchiladas.

4 boneless skinless chicken breasts
(if frozen no need to thaw them out)
1 package of dry Enchilada Sauce mix
(in the sauce aisle)
1 can of tomato sauce

1. Make the sauce according to package directions. This usually involves mixing the sauce packet with the can of tomato sauce and some water.

2. Put the chicken breasts in the slow cooker, cover with prepared sauce.

3. Cook on low 4-6 hours or until the chicken easily shreds with a fork.

4. Shred up all of the chicken and stir it together to create a saucy chicken mixture.

I used to dish up serving sized portions to take to work with me. I'd eat them alone or with a healthy carb.

This can also be used to make enchiladas, put a small amount of the chicken mixture in corn tortillas with a Tbsp. of cheese. Roll up and place in a 9 x 13 dish. Then spread whatever's left in the crock pot over the rolled tortillas and add more cheese. Bake in the oven at 350 for about 20-30 mins.

My next project for a blog is a little tutorial on how to make a clip keeper out of duct tape and a magnet. Perfect size for a locker!

Thursday, January 28, 2010

Use What I Have-- Thursday Challenge-- Old Man Sweater Turned Newborn Cocoon


Like most crafters I know I have WAY, WAY too many projects unfinished. Even more than unfinished projects however, are supplies I have purchased and either never used or are leftover from my unfinished projects.

Then, inevitably, I come up with an idea and that idea requires more craft supplies. It's ridonkulous, really. So my new challenge for myself is to use what I have.

I figured that many of you have old man sweaters laying around and also need newborn photo props. (Ok, could just be me too.)

I was saving these really nice Woolrich sweaters that were handed down to me from my dad to make sweater dresses out of for the girls. My dad is the ultimate sportsman...

What I did:

1. I cut off the sleeve. I made sure not to cut the seam at all, my cut is along the body of the sweater. I then stretched open the seam between the sleeve and body to expose the yarn holding that seam together.

Using sharp scissors, I very carefully unpicked that seam. The result is a finished sleeve edge that won't unravel.


2. I tied a knot and pushed it down to the very bottom of the sleeve. And I put the baby in it.

Grandpa's sweater... grandma's quilt...

Wednesday, January 20, 2010

Valentine's Designs

This has been swirling around in my head for a while now, actually since October! We had a new baby this month, so with the time I should've spent showering or cleaning, I put together three Luvbug costumes for my little ladies.

Introducing our new addition in the newborn sized Luvbug and the newborn pettiskirt (patterns available in my Etsy store.)


And in the toddler size, my little runner... notice the stop sign in the background? I think it suits the picture.

Saturday, January 2, 2010

No- Sew Sleeping Bag-- Zhu Zhu Pet Inspired


What you need:

Fleece scrap that measures 14 inches by 9 inches
Scissors

What you do:

1. As mentioned above, cut your fabric to a 14 inch by 9 inch rectangle. Fold it in half so it measures 7 inches by 9 inches. The 7 inch side will be the sides of your sleeping bag.

2. Make cuts in each side at every inch, 2 inches deep. Cut the last inch strip at the bottom of the bag at the fold. When I did this I folded my fleece in half again to get the cuts lined up on either side.


3. Now tie your strips together at each side in a double knot.


4. Leave the top strip untied. Fold the fabric to the inside at the top of the sleeping bag and pull the remaining strip on each side through the first and second knot. I did my best to take a picture of this. Tie those strips together in a knot.


5. That's it, you're done!

Sunday, December 27, 2009

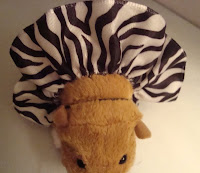
Zebra Ribbon Skirt-- DIY-- Zhu Zhu Inspired


The next no sew clothing item for the Zhu Zhu pet is a ribbon skirt! Doesn't Mr. Squiggles look cute?

What you need:

1 1/2 to 2 inch wide WIRED ribbon, 12" long
Pony Tail Rubber Band

What you do:

1. Cut the ribbon to a length of 12 inches. Pull out some of the wire on one side. Then heat seal the ribbon with a lighter to keep it from fraying. Do this on both cut ends.


2. Pull the wire out some more to gather the ribbon. Wrap the wire around the pony tail rubber band. I used a cheapie one, the same size as the tutu tutorial. Tuck in the ends well and cut the excess wire off. Try to keep the pokies to a minimum since it's for a child's toy.


3. Put the pony tail rubber band around your Zhu Zhu Pet. Gather the ribbon more by pulling the wire from the other cut side of the ribbon. Wrap the wire around the pony tail rubber band again as you did in the last step. Cut the wire, minimize pokies.


The "skirt" lays across the back of the toy and the rubber band goes around the body...


What's next on the list? How about a Zhu Zhu sleeping bag that can also be constructed without sewing???

Have you seen my new patterns/tutorials? For your dress up needs, a shoulder wrap/infant pettiskirt, and a few tutu dress designs are available in my Etsy shop. Those will be featured soon as well.

Saturday, December 26, 2009

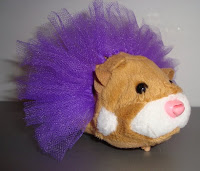
DIY No Sew Tutu-- Zhu Zhu Inspired


The girls received Mr. Squiggles and Num Nums for Christmas this year. I thought this would be a cute project that can be done with tulle scraps and a pony holder.

The tutu works for other dolls as well... we tried it on a CareBear and the mom from the Loving Family collection. :)

Also it can be worn in the hair. I like multi purpose projects!


What you need:

Tulle Scraps
Elastic Pony Tail Holder
Scissors

What you do:

1. I used 6" wide tulle strips and then I cut them in half so that each strip ended up being 3" in length. My strips were about 1 1/2 inches to 2 inches wide.


The pony holder I used is about 1/2 inch in diameter, it's one of the cheepie ones that can be bought in large packages at the store. You can use whatever you have on hand.

2. So then I just tied them on the ring. I used a single knot (picture below left) and tied them on one at a time. In total I used 24 strips. Finished doll tutu shown at right below.


3. To use the tutu on a Zhu Zhu, slide all the strips together so that the fluff is on the top and the pony holder only goes under the pet.

Below left is Mr. Squiggles again in his tutu, this time stacked over a longer one where I used 6" long strips and left over cord elastic that came on some shoes.


Folks, I did not stop here... next will be a tutorial on how to make a skirt from ribbon... again, no sewing required!

Tuesday, April 14, 2009

Button Pony Tail Holder -- How To


Well I haven't been blogging much at all! But I do have a little project for you. I like things that are #1 quick, #2 don't require a trip away from home and #3 are useable.

This meets all the requirements... enjoy! Oh and I just used stuff I had laying around... the cuteness potential of what you could make is very high!

What you need:

Two clear elastic ponytail holders
Two buttons
Possibly a needle and some thread

What you do:

1. Hook the two clear elastics together to form one band.


2. Take one elastic band and loop it through a button. To make this easier you can thread a needle and use the thread to pull the the elastic through the button hole.


So you can see in the first picture that I pulled the elastic through the button shank and then pulled the other end of the pony holder through the loop to make a slip knot. Repeat this step for the other side with the other button. Pull buttons to tighten slip knots.


That's it. Pretty simple. Here's a few pictures of some other ones I made and a picture of the inspiration... An original 1980's hair tie bought from the Clackamas Town Center's Hello Kitty store!