Sunday, December 27, 2009

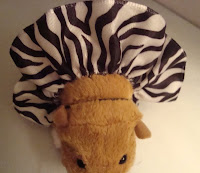
Zebra Ribbon Skirt-- DIY-- Zhu Zhu Inspired


The next no sew clothing item for the Zhu Zhu pet is a ribbon skirt! Doesn't Mr. Squiggles look cute?

What you need:

1 1/2 to 2 inch wide WIRED ribbon, 12" long
Pony Tail Rubber Band

What you do:

1. Cut the ribbon to a length of 12 inches. Pull out some of the wire on one side. Then heat seal the ribbon with a lighter to keep it from fraying. Do this on both cut ends.


2. Pull the wire out some more to gather the ribbon. Wrap the wire around the pony tail rubber band. I used a cheapie one, the same size as the tutu tutorial. Tuck in the ends well and cut the excess wire off. Try to keep the pokies to a minimum since it's for a child's toy.


3. Put the pony tail rubber band around your Zhu Zhu Pet. Gather the ribbon more by pulling the wire from the other cut side of the ribbon. Wrap the wire around the pony tail rubber band again as you did in the last step. Cut the wire, minimize pokies.


The "skirt" lays across the back of the toy and the rubber band goes around the body...


What's next on the list? How about a Zhu Zhu sleeping bag that can also be constructed without sewing???

Have you seen my new patterns/tutorials? For your dress up needs, a shoulder wrap/infant pettiskirt, and a few tutu dress designs are available in my Etsy shop. Those will be featured soon as well.

Saturday, December 26, 2009

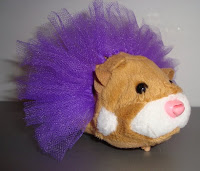
DIY No Sew Tutu-- Zhu Zhu Inspired


The girls received Mr. Squiggles and Num Nums for Christmas this year. I thought this would be a cute project that can be done with tulle scraps and a pony holder.

The tutu works for other dolls as well... we tried it on a CareBear and the mom from the Loving Family collection. :)

Also it can be worn in the hair. I like multi purpose projects!


What you need:

Tulle Scraps
Elastic Pony Tail Holder
Scissors

What you do:

1. I used 6" wide tulle strips and then I cut them in half so that each strip ended up being 3" in length. My strips were about 1 1/2 inches to 2 inches wide.


The pony holder I used is about 1/2 inch in diameter, it's one of the cheepie ones that can be bought in large packages at the store. You can use whatever you have on hand.

2. So then I just tied them on the ring. I used a single knot (picture below left) and tied them on one at a time. In total I used 24 strips. Finished doll tutu shown at right below.


3. To use the tutu on a Zhu Zhu, slide all the strips together so that the fluff is on the top and the pony holder only goes under the pet.

Below left is Mr. Squiggles again in his tutu, this time stacked over a longer one where I used 6" long strips and left over cord elastic that came on some shoes.


Folks, I did not stop here... next will be a tutorial on how to make a skirt from ribbon... again, no sewing required!

Tuesday, April 14, 2009

Button Pony Tail Holder -- How To


Well I haven't been blogging much at all! But I do have a little project for you. I like things that are #1 quick, #2 don't require a trip away from home and #3 are useable.

This meets all the requirements... enjoy! Oh and I just used stuff I had laying around... the cuteness potential of what you could make is very high!

What you need:

Two clear elastic ponytail holders
Two buttons
Possibly a needle and some thread

What you do:

1. Hook the two clear elastics together to form one band.


2. Take one elastic band and loop it through a button. To make this easier you can thread a needle and use the thread to pull the the elastic through the button hole.


So you can see in the first picture that I pulled the elastic through the button shank and then pulled the other end of the pony holder through the loop to make a slip knot. Repeat this step for the other side with the other button. Pull buttons to tighten slip knots.


That's it. Pretty simple. Here's a few pictures of some other ones I made and a picture of the inspiration... An original 1980's hair tie bought from the Clackamas Town Center's Hello Kitty store!


Saturday, March 21, 2009

Mermaid Tail Tutu Tutorial


Even my one and a half year old loves mermaids! You should hear her say it, it's so cute! I made this for daughter #1's 3rd birthday. She will not wear it but also will not let me give it away. Makes me wonder what goes on in her little head...

The pictures above show the front and back of the tutu. Here's how I did it.

What you need:

1/2" wide no roll elastic
28 strips of 18" long tulle
20 strips of 36" long tulle

About the materials:

My elastic band is about 19" in diameter.

To get 20 strips of 6.5" wide and 36" long tulle you'll need to buy about 2 yards of 52" inch wide stuff that is on the bolts. Or you could buy one 25 yard spool of 6" wide tulle.

To get 28 strips of 6.5" wide and 18" long tulle you'll need to buy about 1 1/2 yards of 52" inch wide tulle. Or you can buy one 25 yard spool of 6" wide tulle.

If you want to use more than one color you'll have to figure out how much of each color you need. You want the lengths of the colors to be at least 36" for the tail and 18" for the front, so don't get less cut if you buy from the bolts. If this is at all confusing, please, just buy the spools. :)

What you do:

1. Sew the elastic into a loop overlapping the ends about 1" or so. You can do this with a sewing machine or by hand.

2. Cut the tulle into the lengths I mentioned above. Tie the 18" lengths on in a row, I staggered the ends on my tutu. Fold the 36" lengths in half and tie them on all in a row. (This is going to be the tail.)

Here are a couple images to help you understand how to tie on the tulle.

Fold the strip in half and pull the ends through the loop around the elastic. I put the elastic loop around my thigh to make it easier.


3. Use some of the extra strips you cut for this next step. You'll notice in my poor quality pictures that my 'tulle' looks more like nylon net. It is. I don't recommend using net though... but I figured this one would give you the basic idea of what I did.

-Find the middle 6 strips of your tail. They should be 9 strips in on each side from your 18" lengths. Bundle them together with a strip of tulle about 4" down from the waist band. (My tie is in the magenta color.)


- Take the next four strips on either side of the bundle and use another piece of tulle to tie the tail about 2" below the place where you tied the 6 strips. (My thumb nail is at the point where I made the bundle.) Notice that I'm including the first bundle into this one.


- You should have 5 strips of 36" long tulle left. Take those strips and make another bundle about 2" below the last one. (My thumb nail is at the place where I tied and I made one big bundle of all the strips.)


- Divide any length that is poking out into two and tie each half with tulle scraps to make the points of the tail.


Yes, well, that should do it. Now you know why the tutus in the stores cost so much! All the cutting and tying takes time folks. :)

If you make one send me pics! If you want to make and sell these, please let me know first. Thanks!

(I learned how to make a tutu from here... http://mamasdoodles.blogspot.com/2007/08/tutu-tutorial-tuturial.html )

Wednesday, March 18, 2009

Time and Money Saving Tip of the Day

How much are you supposed to blog? Is there a rule? Is one a day annoying?

Today I'm just going to share two things with you.

Time Saver:

1 800 goog 411

One of my least favorite things in the world is to take my 2 daughters shopping. To save time I call that number. They ask for the business name followed by the city and state and then they connect you for free! I call while I'm driving (don't hate me) to see if the store has what I need and how much it is. Like today, I found out that colored duct tape is available at Michael's and JoAnnes, but one place is less expensive than the other.

Money Saver:

Did you know that Michael's accepts JoAnne's coupons and vice versa? You can go to www.michaels.com and subscribe to their newsletter. They send you coupons you can print from your computer. An added bonus, sign up for The Knack and they'll send you coupons too! I just printed one of for 50% off one item and I'm going to use it to go and buy some neon colored duct tape.

Next blog is the Mermaid Tail Tutu...

No Sew Ribbon Headband (My first tutorial)


What you need:

$ Ribbon
$ Ponytail Holder
$ Hot Glue Gun
$ Lighter

What you do:

1. You need to measure the head that you're making the headband for. Take the ribbon and put it under the hair at the nape of the neck and bring the ends up and around where the headband would be worn. You want it to be snug, not tight. (In the picture above I used 1" wide ribbon.)

2. Cut the ribbon to the length you measured and heat seal the ends with a lighter. It's always good to measure twice, and cut once so remember that.

3. Make sure your glue gun is warmed up enough to use and have your ribbon and hair tie ready for action. I used a small pony tail holder, the kind you use for braids that has a metal thingy on it. It was probably like an inch in diameter. If you use a larger or smaller hair tie you will have to judge how much space your hair tie is going to take up and adjust your ribbon measurement accordingly.

4. Put some hot glue about an inch up from one end of the cut ribbon. Loop the heat sealed end around the hair tie and secure it to the glue. Hold it together with your fingers, but don't burn yourself! At this point your ribbon should have one end that is folded over about a half inch and glued around the pony tail holder.

5. Repeat step 4 with the other end of the ribbon. Be sure that both heat sealed edges are on one side of the headband and that you don't twist the ribbon. When you finish this step your ribbon should make a continuous loop.

6. If you want to you can take another length of ribbon and tie it in a knot to the pony tail holder on the head band you just made. This gives it a "tied on" look.

Next on the agenda... I'm going to show you how I made a 'mermaid tail' tutu. For those of you who wonder when I sleep... I went to bed at 9pm and was awoken by a baby about 1130pm which is when I did the blog, and now I'm off to bed again. See, I sleep.

Tuesday, March 17, 2009

Intro and First Blog

Well, here it goes, another thing to suck up some time. :) I've wanted to do a blog for a while but I was holding back. Who cares about my ideas besides me? Are they really novel or are they already out there in the internet abyss? Time to find out!

So, about me. I was sewing before I learned how to ride a bike. In junior high I started doing strange fashion things that actually might be in style now. (They weren't then.) Like for instance, my mom and I re-purposed some hot pink satin pajamas and I wore them to school at least once. I had several custom made outfits and one super cool vest made out of blue satin Taffeta. And I have to mention my tie skirt. I've talked to people fairly recently who still remember my tie skirt. I still have it actually.

I also started selling crafts around that junior high age. I designed a pattern for a Swatch Watch protector that I made friendship bracelet style out of embroidery floss. I sold some (rainbow) fimo clay stuff and suckers. Yes, I used to sell home made suckers on my bus for 50 cents each. The sugar high might have contributed to the unrulyness of the back seaters. I'm thankful we never made Rus wreck the bus!

So some things don't change much. I for one am estatic that neon is coming back into style, even if I'm too old to actually wear it. I still like rainbows and I still have an odd sense of style. I'm working on it, but my kids sure like the stuff I make! Ok, most of it they like. Some times they run from me when I ask them to try on (another) dress.

The purpose I have in mind for this blog is to share my ideas and do some tutorials. My prayer is that this will help me with the compulsion to make every single thing that I think of and it will also help me get over the fear of having my ideas stolen... which is laughable, you know? There's nothing new under the sun, as Soloman said.